Since participating in Intel's Perceptual Computing Developer Challenge last year, I've wanted to post a write up on the experience. This won't be exactly that. What I ended up writing was an introduction to using the Perceptual Computing SDK within Processing, both as a means of reintroducing myself to the framework after not having used it for the last few months, and in order to write a little application that I might actually use. Hopefully this proves useful to anyone who is new to the SDK, new to Processing, or both.
The application
We are going to develop a simple news reader app that allows users to navigate with quick hand gestures and voice recognition. This should give us a good intro into the core capabilities of the SDK, while keeping the complexity of the application logic low.
Setup
You will need the following in order to get started:
- Windows 7 (Service Pack 1 or higher) or Windows 8 (the SDK is, sadly, Windows only for the time being)
- The Creative Senz3D camera (so far the only camera that supports the Perceptual SDK)
- The Intel Perceptual Computing SDK installed
- Processing
Installing the Processing Perceptual SDK Library
The Perceptual SDK library for Processing comes bundled with the SDK. You can find it in C:\Program Files (x86)\Intel\PCSDKframework\Processing\libraries\PXCUPipeline (assuming you installed the SDK in the default folder). Copy the entire PXCUPipeline folder into your Processing libraries folder ([User Folder]\Documents\Processing\libraries).
Test the Library
Open Processing and enter the following code. We'll go over each section later, but first we need to make sure the library is working properly.
import intel.pcsdk.*;

PXCUPipeline session;

PImage displayLM;

void setup(){
    size(800,600);

    session = new PXCUPipeline(this);
    if (!session.Init(PXCUPipeline.GESTURE))
        exit();

    int[] sizeLM = new int[2];
    session.QueryLabelMapSize(sizeLM);

    displayLM = createImage(sizeLM[0],sizeLM[1],RGB);
}

void draw(){
    if (!session.AcquireFrame(false)) return; // could not acquire camera data

  session.QueryLabelMapAsImage(displayLM);
  session.ReleaseFrame();

  background(0);
  image(displayLM,0,0);
}
Now run the sketch. You should see something like this:
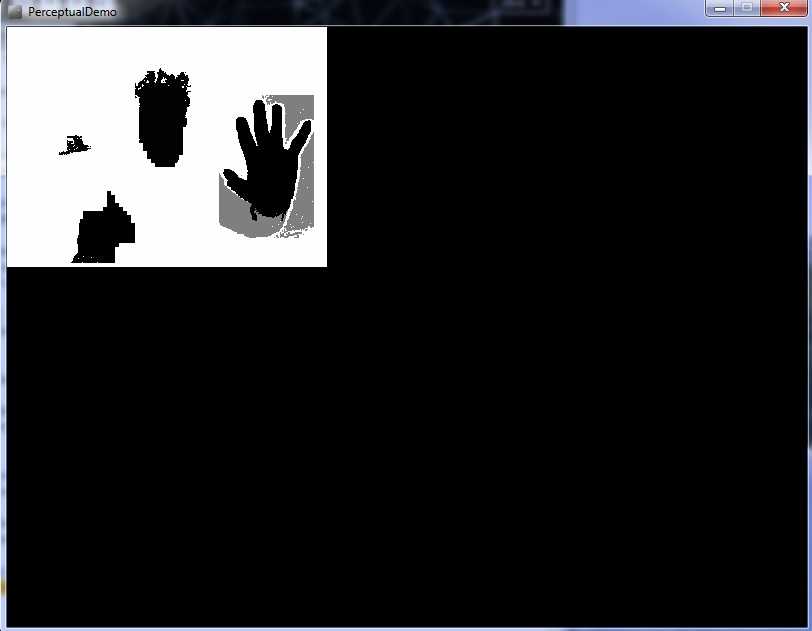
If you get an error in the console or the sketch exits automatically, there may be something wrong with the library or the SDK. Try reinstalling both. Let's have a look at what our code is doing. First, we import the Perceptual library.
import intel.pcsdk.*;
Then, we declare the object that we will be using to configure and access data from the camera.
PXCUPipeline session;
Inside setup, we initialize the camera and configure it to operate in Gesture Detection mode. The camera can be set to operate in multiple modes at once, which we'll look at later.
session = new PXCUPipeline(this);
if (!session.Init(PXCUPipeline.GESTURE))
    exit();
Now, we check the dimensions of the Label Map feed from the camera. The Label Map identifies specific limbs on the body (hands and fingers) and is used in gesture detection. You can also grab the RGB feed or the Depth feed (the raw data from the infrared camera), but they require the camera to be set to different operating modes.
int[] sizeLM = new int[2];
session.QueryLabelMapSize(sizeLM);
Once we have the dimensions, we create a PImage to store the image from the Label Map.
displayLM = createImage(sizeLM[0],sizeLM[1],RGB);
Inside the draw function, we first check that we can actually grab a frame from the camera. If this fails, we simply ignore the rest of the code.
if (!session.AcquireFrame(false)) return; // could not acquire camera data
Now we take the Label Map data from the frame we grabbed in the previous step and assign it to the PImage we created earlier. Before we can grab a new frame on the next draw loop, we have to release the current frame.
session.QueryLabelMapAsImage(displayLM);
session.ReleaseFrame();
Now that we have our Label Map data, we clear the drawing window and draw the image.
background(0);
image(displayLM,0,0);
Now that we know the camera and SDK are working properly, we will set up a few gestural controls.
Gestural Controls
In order to determine if a gesture or pose has been made, we need to query the camera for gesture data. To do this, we pass the camera the label of the body part we want to check and a Gesture object to store the resulting data. We will make this query inside the draw function:
void draw(){
    ...
    session.QueryLabelMapAsImage(displayLM);
    PXCMGesture.Gesture gesture_data = new PXCMGesture.Gesture();
    if (session.QueryGesture(PXCMGesture.GeoNode.LABEL_BODY_HAND_PRIMARY, gesture_data)){
        println ("Gesture detected");
    }
    session.ReleaseFrame();
    ...
}
Now run the sketch and raise a hand up to about one meter away from the camera (if you can see the grey box around your hand, it's being detected). Make some swiping gestures left and right and try one of the predefined poses (making a peace sign with your index and middle finger, for instance). If everything is working properly, the sketch should start printing "Gesture detected" to the console. It doesn't do us much good to simply pick up every gesture, so let's narrow things down a bit. Once we know a gesture has been detected (QueryGesture returns true), we can check which gesture was picked up against a list of predefined gestures.
if (session.QueryGesture(PXCMGesture.GeoNode.LABEL_BODY_HAND_PRIMARY, gesture_data)){
    if (gesture_data.label == PXCMGesture.Gesture.LABEL_NAV_SWIPE_LEFT){
        println ("Swipe left detected");
    } else if (gesture_data.label == PXCMGesture.Gesture.LABEL_NAV_SWIPE_RIGHT){
        println ("Swipe right detected");
    } else if (gesture_data.label == PXCMGesture.Gesture.LABEL_NAV_SWIPE_DOWN){
        println ("Swipe down detected");
    } else if (gesture_data.label == PXCMGesture.Gesture.LABEL_NAV_SWIPE_UP){
        println ("Swipe up detected");
    }
}
Run the sketch again and try swiping left, right, up and down. You may find swiping up and down to be a bit less natural (and harder to pick up for the camera). Keep at it and try to figure out the optimal distance from the camera to position your hands (Intel's docs recommend swiping about one foot from the camera). Once you have the sketch printing the appropriate statements to the console, we can move on and start building the news reader part of our application.
Grabbing an RSS Feed
Getting data from an RSS feed in Processing is quite simple, since RSS feeds just consist of XML data and Processing has a built-in class for handling XML. First, we need to select a feed. We're going to use the Top Stories feed from The Guardian UK, because they publish full text articles in their RSS feed. We will add the URL of our RSS feed to our global variables.
String feedUrl = "http://feeds.theguardian.com/theguardian/uk/rss";
Now, let's create a function to process the RSS feed.
void processRssFeed(String url) {
    XML xml = loadXML(url);

    XML channel = xml.getChild("channel");

    XML[] children = channel.getChildren("item");
    for (int i=0;i<children.length;i++){
        XML title = children[i].getChild("title");
        println (title.getContent());
    }
}
If you look at the XML of the feed, it may make it easier to see what we're doing here. First, we grab the XML data from the feed URL. Then, we load the main child node from the data (called "channel"). Inside "channel", there are a bunch of child nodes called "item", each of which represents one news story. We loop through each of those and print out its title. Now call this function at the end of setup.
processRssFeed(feedUrl);
Run the sketch. You should see something like this in your console:
Generation jitters: are we addicted to caffeine?
Ukraine crisis: Putin says 'Russia cannot ignore calls for help' in Crimea – live updates
Italian campaigners call for housewives to be paid a salary
Oscar Pistorius fired gun through car sunroof in anger, says ex-girlfriend
Machu Picchu streakers at rock bottom as authorities enforce cover-up
Madrid's mayor seeks curb on protesters in central square
Nicolas Sarkozy's phones bugged over Gaddafi allegations, claims newspaper
Obviously, the titles will be different, but you get the idea. Now that we have data coming in, let's start setting up the interface.
Building the Interface
We want this application to present the following pieces of information:
- The name of our RSS feed
- The title of each article with an option to read the full article
- A detailed view with the full text of each article
Feed Name
Let's start with the name of the RSS feed. We will need a new global variable to hold the information:
String feedName;
Now, in the processRssFeed function, we can get the feed name from the Channel node.
feedName = channel.getChild("title").getContent();
In the draw function, we'll delete the code that draws the Label Map and replace it with code to draw the feed name at the top of the screen.
background(0);
textSize(18);
fill(255);
textAlign(LEFT,TOP);
text(feedName,10,10);
Articles
Next, we will create a small class to hold our Articles. Create a new tab in the Processing IDE and name it Article. Now create the class in the new tab.
class Article {
    String title;
    String content;

    Article (String title_, String content_) {
        this.title = title_;
        this.content = content_;
    }
}
Since we don't necessarily know how many articles we will receive from the feed, we will store them in an ArrayList, for ease of access and manipulation. Back in your main tab, add a new global variable called articles.
ArrayList<Article> articles;
Inside setup, before you run processRssFeed, initialize the ArrayList.
articles = new ArrayList<Article>();
Now, inside processRssFeed, we can start populating the ArrayList.
XML title = children[i].getChild("title");
XML content = children[i].getChild("description");
String strippedContent = content.getContent().replaceAll("</p>","nn").replaceAll("\<.*?\>", ""); //convert the content to plain text with line breaks, rather than html
Article article = new Article(title.getContent(),strippedContent);
articles.add(article);
Back in draw, we can list the article titles.
textSize(14);
for (int i=0;i<articles.size();i++){
    text(articles.get(i).title,10,40+i*30);
}
Navigation
We list of articles we are drawing on screen is fine to show that the data is coming in properly, but in the final app, we are going to show one article at a time, with the option to either read more, go to the next article, or go to the previous article. Let's set that up. First, we need a global index variable to show which article is currently being displayed.
int currentArticle = 0;
Now, in the draw code, we will replace the list of articles with a single article title.
textSize(14);
text(articles.get(currentArticle).title,10,40);
For now, we will use the keyboard to navigate. We'll set up our gestural interface later. Create the function keyPressed.
void keyPressed(){
    if (keyCode==LEFT){
        currentArticle--;
        if (currentArticle<0){
            currentArticle = articles.size()-1;
        }
    } else if (keyCode==RIGHT) {
        currentArticle++;
        if (currentArticle>=articles.size()){
            currentArticle=0;
        }
    }
}
Try running this code and press the left and right arrow keys to navigate. If you are able to navigate successfully, we'll move on.
Article View
Let's build the full article view. The first thing we'll need is a global mode variable to determine whether we are viewing a full article or the navigation list.
int MODE_NAVIGATION = 0;
int MODE_ARTICLE = 1;

int currentMode = MODE_NAVIGATION;
We use a pair of constants to store the values for our different modes, so that we can refer to them later in a readable way. Now, inside draw, we will check the mode and draw a full text article, if required.
textSize(14);
text(articles.get(currentArticle).title,10,40);

if (currentMode==MODE_NAVIGATION){
    textSize(12);
    text("Read this article...",10,70);
    text("Next article...",10,90);
    text("Previous article...",10,110);
} else if (currentMode==MODE_ARTICLE){
    textSize(12);
    text(articles.get(currentArticle).content,10,70);
}
In the key pressed function, we'll add some conditions to allow us to move in and out of the Article Detail view.
if (keyCode==LEFT){
    currentArticle--;
    if (currentArticle<0){
        currentArticle = articles.size()-1;
    }
} else if (keyCode==RIGHT) {
    currentArticle++;
    if (currentArticle>=articles.size()){
        currentArticle=0;
    }
} else if (keyCode==DOWN){
    currentMode = MODE_ARTICLE;
} else if (keyCode==UP){
    currentMode = MODE_NAVIGATION;
}
Run the sketch and you should be able to navigate between articles, open the article view, and go back to the navigation view. You'll notice a problem, though. If the text of the article is too long, it disappears off the bottom of the screen. We'll need to paginate the text. In the Article class, we add two properties to hold the content of each page of the article and which page is currently being displayed.
class Article {
    ...
    int currentPage;
    ArrayList<String> pages;
    ...
}
In order to figure out how to divide the content up into pages, we need to first calculate a) how many lines we can fit on a screen; and b) how many lines are in our text. To do the latter, we need to implement a word-wrapping function. Processing will automatically wrap our text for display, but it won't give us the number of lines, so we have to roll our own word-wrapper. In this case, I've gone ahead and written one. I won't get into explaining it, since it's outside the scope of this article, but you should copy and paste it into your Article tab, but outside of the Article class.
String wordwrap(String basestring,int maxlen)
{
    String newstring="";
    String newline="";

    String[] lines = basestring.split("n");

    for (int i=0;i<lines.length;i++){
        String s = lines[i];

        if (s.length() > maxlen){
            while (true){
                int marker = maxlen-1;
                while (!isspace(s.charAt(marker)) && !isnewline(s.charAt(marker))){
                    marker-=1;
                }
                //remove line from original string and add it to the new string
                newline=s.substring(0,marker)+"n";
                newstring = newstring+newline;
                s = s.substring(marker+1);

                if (s.length()<=maxlen){
                    break;
                }
            }
        }
        newstring = newstring + s +"n";
    }
    return newstring;
}

boolean isspace(char c){
    return (c==' ');
}

boolean isnewline(char c){
    return (c=='n');
}
Now, in the Article constructor, we will word wrap the text before assigning it to the content property.
Article (String title_, String content_) {
    ...
    this.content = wordwrap(content_, width/7);
    ...
}
We will add a method to the Article class, to divide the content up into pages.
class Article {
    ...
    void divideIntoPages(){
        pages = new ArrayList<String>();
        int linesPerPage = (height-40) / 24;
        String[] lines = this.content.split("n");
        for (int page=0;page<=floor(lines.length/linesPerPage);page++){
            String pageText="";
            for (int l=page*linesPerPage;l<(page+1)*linesPerPage;l++){
                if (l<lines.length){
                    pageText+=lines[l]+"n";
                }
            }
            pages.add(pageText);
        }
    }
}
And call this method immediately after the word-wrap in the constructor. We will also initialize the currentPage variable.
Article (String title_, String content_) {
    ...
    this.content = wordwrap(content_, width/7);
    this.divideIntoPages();
    this.currentPage = 0;
}
And we'll add some methods to get the content of the current page, and navigate to the next and previous pages.
class Article {
    ...
    String getCurrentPage(){
        return this.pages.get(this.currentPage);
      }

    boolean nextPage(){
        if (currentPage<pages.size()-1){
            currentPage++;
            return true;
        } else {
            return false;
        }
    }

    boolean previousPage(){
        if (currentPage>0){
            currentPage--;
            return true;
        } else {
            return false;
        }
    }
}
You'll notice the nextPage and previousPage methods return boolean values. This is so, later on, we can inform the user that they have reached the final page. Back in the main sketch tab, we need to adjust our navigation code to take into account our new pagination.
void keyPressed(){
    if (keyCode==LEFT){
        if (currentMode==MODE_NAVIGATION){
            currentArticle--;
            if (currentArticle<0){
                //wrap back to the last article
                currentArticle = articles.size()-1;
            }
        } else if (currentMode==MODE_ARTICLE){
            articles.get(currentArticle).previousPage();
        }
    } else if (keyCode==RIGHT) {
        if (currentMode==MODE_NAVIGATION){
            currentArticle++;
            if (currentArticle>=articles.size()){
                //wrap to the first article
                currentArticle=0;
            }
        } else if (currentMode==MODE_ARTICLE){
            articles.get(currentArticle).nextPage();
        }
    } else if (keyCode==DOWN){
        currentMode = MODE_ARTICLE;
    } else if (keyCode==UP){
        currentMode = MODE_NAVIGATION;
    }
}
And in the draw function, we will output only the content for the current page of the active article.
void draw(){
    ...
    if (currentMode==MODE_NAVIGATION){
        ...
    } else if (currentMode==MODE_ARTICLE){
        textSize(12);
        text(articles.get(currentArticle).getCurrentPage(),10,70,width-20,height-80);
    }
}
Run the sketch. You should now be able to navigate between articles in Navigation Mode by pressing Left and Right. Pressing Down should reveal the article text and allow you to navigate between pages by pressing Left and Right. Pressing Up should return you to Navigation Mode. If everything is working properly, we can set our gestural controls to activate our navigation functions.
Mapping the Gestural Controls
While we are planning to control the app using gestures, we may as well keep our keyboard controls accessible, so let's break our navigation code out into its own set of functions, so we can reuse it.
void navigateNext(){
    if (currentMode==MODE_NAVIGATION){
        currentArticle++;
        if (currentArticle>=articles.size()){
            currentArticle=0;
        }
    } else if (currentMode==MODE_ARTICLE){
        articles.get(currentArticle).nextPage();
    }
}

void navigatePrevious(){
    if (currentMode==MODE_NAVIGATION){
        currentArticle--;
        if (currentArticle<0){
            currentArticle = articles.size()-1;
        }
    } else if (currentMode==MODE_ARTICLE){
        articles.get(currentArticle).previousPage();
    }
}

void navigateEnter(){
    currentMode = MODE_ARTICLE;
}

void navigateExit(){
    currentMode = MODE_NAVIGATION;
}
Now we will call these functions from both our keyboard controls and the gestural controls we set up earlier. When we implement the gestural controls, left and right will be reversed, because when we swipe to the left, we actually want to move right (or forward).
void draw(){
    ...
    if (session.QueryGesture(PXCMGesture.GeoNode.LABEL_ANY, gesture_data)){
        if (gesture_data.label == PXCMGesture.Gesture.LABEL_NAV_SWIPE_LEFT){
            navigateNext();
       } else if (gesture_data.label == PXCMGesture.Gesture.LABEL_NAV_SWIPE_RIGHT){
            navigatePrevious();
        } else if (gesture_data.label == PXCMGesture.Gesture.LABEL_NAV_SWIPE_DOWN){
            navigateEnter();
        } else if (gesture_data.label == PXCMGesture.Gesture.LABEL_NAV_SWIPE_UP){
            navigateExit();
        }
    }
    ...
}

void keyPressed(){
    if (keyCode==LEFT){
        navigatePrevious();
    } else if (keyCode==RIGHT) {
        navigateNext();
    } else if (keyCode==DOWN){
        navigateEnter();
    } else if (keyCode==UP){
        navigateExit();
    }
}
Run the sketch and try navigating around with your hands. You should find that it works, but it's hard to tell whether your hands are being picked up by the camera. Let's add small indicator to the interface, so we can see where our hands are in relation to the app. First, we'll create two global GeoNode objects and two PVectors to store the hand positions:
PXCMGesture.GeoNode primaryHandNode;
PVector primaryHandPos;
PXCMGesture.GeoNode secondaryHandNode;
PVector secondaryHandPos;
Initialize the objects in setup:
void setup(){
    ...
    primaryHandNode = new PXCMGesture.GeoNode();
    primaryHandPos = new PVector();
    secondaryHandNode = new PXCMGesture.GeoNode();
    secondaryHandPos = new PVector();
}
And query for the locations in the draw loop:
void draw(){
    ...
    if (session.QueryGeoNode(PXCMGesture.GeoNode.LABEL_BODY_HAND_PRIMARY|PXCMGesture.GeoNode.LABEL_HAND_MIDDLE,primaryHandNode)){
        primaryHandPos = new PVector(primaryHandNode.positionImage.x,primaryHandNode.positionImage.y);
    }

    if (session.QueryGeoNode(PXCMGesture.GeoNode.LABEL_BODY_HAND_SECONDARY|PXCMGesture.GeoNode.LABEL_HAND_MIDDLE,secondaryHandNode)){
        secondaryHandPos = new PVector(secondaryHandNode.positionImage.x,secondaryHandNode.positionImage.y);
    }

    session.ReleaseFrame();

    ...

}
Now that we have the coordinates for each hand, we will draw them to the screen.
void draw(){
    ...
    fill(255,50);
    noStroke();
    ellipseMode(CENTER);
    ellipse(primaryHandPos.x,primaryHandPos.y,20,20);
    ellipse(secondaryHandPos.x,secondaryHandPos.y,20,20);   }
Run the sketch. When you raise your hands, you should see two circles moving along with them. But there are two problems. The camera's label map mirrors your image, so the X coordinates are reversed, and the positionImage attribute that we are using gives us the coordinates within the label map image, which is only 320x240. We can solve both of these problems easily, using Processing's built in map function. While we're at it, let's give the secondary hand a slightly different colour, so we can distinguish them.
void draw(){
    ...
    fill(255,50);
    noStroke();
    ellipseMode(CENTER);
    ellipse(map(primaryHandPos.x,0,displayLM.width,width,0),map(primaryHandPos.y,0,displayLM.height,0,height),20,20);
    fill(0,0,255,50);
    ellipse(map(secondaryHandPos.x,0,displayLM.width,width,0),map(secondaryHandPos.y,0,displayLM.height,0,height),20,20);   }
Much better. You will probably find the circles are a bit jittery. We won't worry about that in this example, since we only using the positions as an indicator, but if you needed more steady coordinates for the functionality of your application, you could apply a smoothing algorithm to the hand vectors. Another nice feature of the Perceptual Computing SDK is voice recognition. Since we already have our navigation functions set up, we should be able to add voice recognition pretty easily.
Voice Recognition
In order to use voice recognition, we need to add it as a parameter to our Pipeline init function. In setup: void setup(){ ... if (!session.Init(PXCUPipeline.GESTURE|PXCUPipeline.VOICE_RECOGNITION)) exit(); ... } We need to provide a set of commands to listen for, so let's create a global array of Strings:
String[] commands = {"next", "previous", "read", "view", "exit", "back"};
"Read" and "view" will trigger the same action, as will "exit" and "back", but we're including extra options in both cases because I find "view" and "back" are a bit easier for the SDK to pick up. Now, we provide the commands to the SDK:
void setup() {
    ...
    if (!session.Init(PXCUPipeline.GESTURE|PXCUPipeline.VOICE_RECOGNITION))
        exit();

    session.SetVoiceCommands(commands);
    ...
}
In the draw function, we will check if any commands have been recognized and take the appropriate action.
void draw(){
    ...
    PXCMVoiceRecognition.Recognition voiceData = new PXCMVoiceRecognition.Recognition();
    if(session.QueryVoiceRecognized(voiceData)){
        if (voiceData.dictation.equals("next")){
            navigateNext();
        } else if (voiceData.dictation.equals("previous")){
            navigatePrevious();
        } else if (voiceData.dictation.equals("read") || voiceData.dictation.equals("view")){
            currentMode=MODE_ARTICLE;
        } else if (voiceData.dictation.equals("exit") || voiceData.dictation.equals("back")){
            currentMode=MODE_NAVIGATION;
        }
    }

    session.ReleaseFrame();
    ...
}
We now have a functioning application, with three different options for navigation, but it's pretty ugly. Let's make a few design changes to make the whole experience more enjoyable.
Design
If you looked at the source of our RSS feed, you may have noticed that each article has a number of <media> tags, which contain images. Let's display one of those images along with the article title in the navigation view, to give us a better idea of what each article is about. First, we'll add an image property to the Article class and initialize it in the constructor.
class Article {
    String title;
    String content;
    int currentPage;
    ArrayList<String> pages;
    PImage image;

    Article (String title_, String content_, String image_url_){
        ...
        this.image = loadImage(image_url_);
    }
    ...
}
Back in the main tab, we'll modify processRssFeed to grab the url from the first image of the article and add it to the constructor.
void processRssFeed(String url){
    ...
    for (int i=0;i<children.length;i++){
        XML title = children[i].getChild("title");
        XML content = children[i].getChild("description");
        XML[] images = children[i].getChildren("media:content");
        String imageUrl = "";
        for (int j=0;j<images.length;j++){
            if (images[j].getString("type").equals("image/jpeg")){
                imageUrl = images[j].getString("url");
                println("Image URL: "+imageUrl);
                break;
            }
        }
        ...
        Article article = new Article(title.getContent(),strippedContent,imageUrl);
        ...

    }
}
If you run the sketch now, you should see urls for the images print out to the console. Finally, we'll modify the draw function to display the article image when we're in navigation mode. Since most of the images are smaller than our sketch window, we'll stretch them to the full height and proportionately scale their width, then centre them in the sketch. We will also fade them into the background, so the headlines are still legible.
void draw(){
    ...
    background(0);
    if (currentMode==MODE_NAVIGATION){
        PImage displayImage = articles.get(currentArticle).image;
        tint(255,100);
        imageMode(CENTER);
        image(displayImage,width/2,height/2,(float)height/displayImage.height * displayImage.width, height);
        noTint();
    }
    ...
}
That looks alright. Now let's increase the title size, to get a nice bold headline. We want a different size of text for the navigation view and the article view, so we'll move the lines that draw the headline into the currentMode if statement.
void draw(){
    ...
    text(feedName,10,10);

    if (currentMode==MODE_NAVIGATION){
        fill(255);
        textSize(48);
        text(articles.get(currentArticle).title,10,40,width-10,height-40);
    } else if (currentMode==MODE_ARTICLE){
        fill(255);
        textSize(18);
        text(articles.get(currentArticle).title,10,40);
        textSize(12);
        text(articles.get(currentArticle).getCurrentPage(),10,70,width-20,height-80);
    }
    ...
}
Since we now have two conditionals checking the currentMode, we may as well put them together and move the code that draws the feedName after them.
void draw(){
    ...
    background(0);

    if (currentMode==MODE_NAVIGATION){
        PImage displayImage = articles.get(currentArticle).image;
        tint(255,100);
        imageMode(CENTER);
        image(displayImage,width/2,height/2,(float)height/displayImage.height * displayImage.width, height);
        noTint();

        textSize(48);
        text(articles.get(currentArticle).title,10,40,width-10,height-40);
    } else if (currentMode==MODE_ARTICLE){
        textSize(18);
        text(articles.get(currentArticle).title,10,40);
        textSize(12);
        text(articles.get(currentArticle).getCurrentPage(),10,70,width-20,height-80);
    }

    textSize(18);
    fill(255);
    textAlign(LEFT,TOP);
    text(feedName,10,10);
    ...
}
That cleans things up a bit. We could do a number of other things to make the app more presentable, including selecting a different font and cleaning up the content a bit more, but I think it's good enough for now.
Conclusion
Thanks for reading. Hopefully this has provided a decent example of what one might do with the Perceptual Computing SDK. You can find the full code on BitBucket: https://bitbucket.org/edkeeble/perceptual-news-reader. If you have any questions or comments about this tutorial, you can find me on Twitter @edkeeble.